Modern Quilts: Designs of the New Century

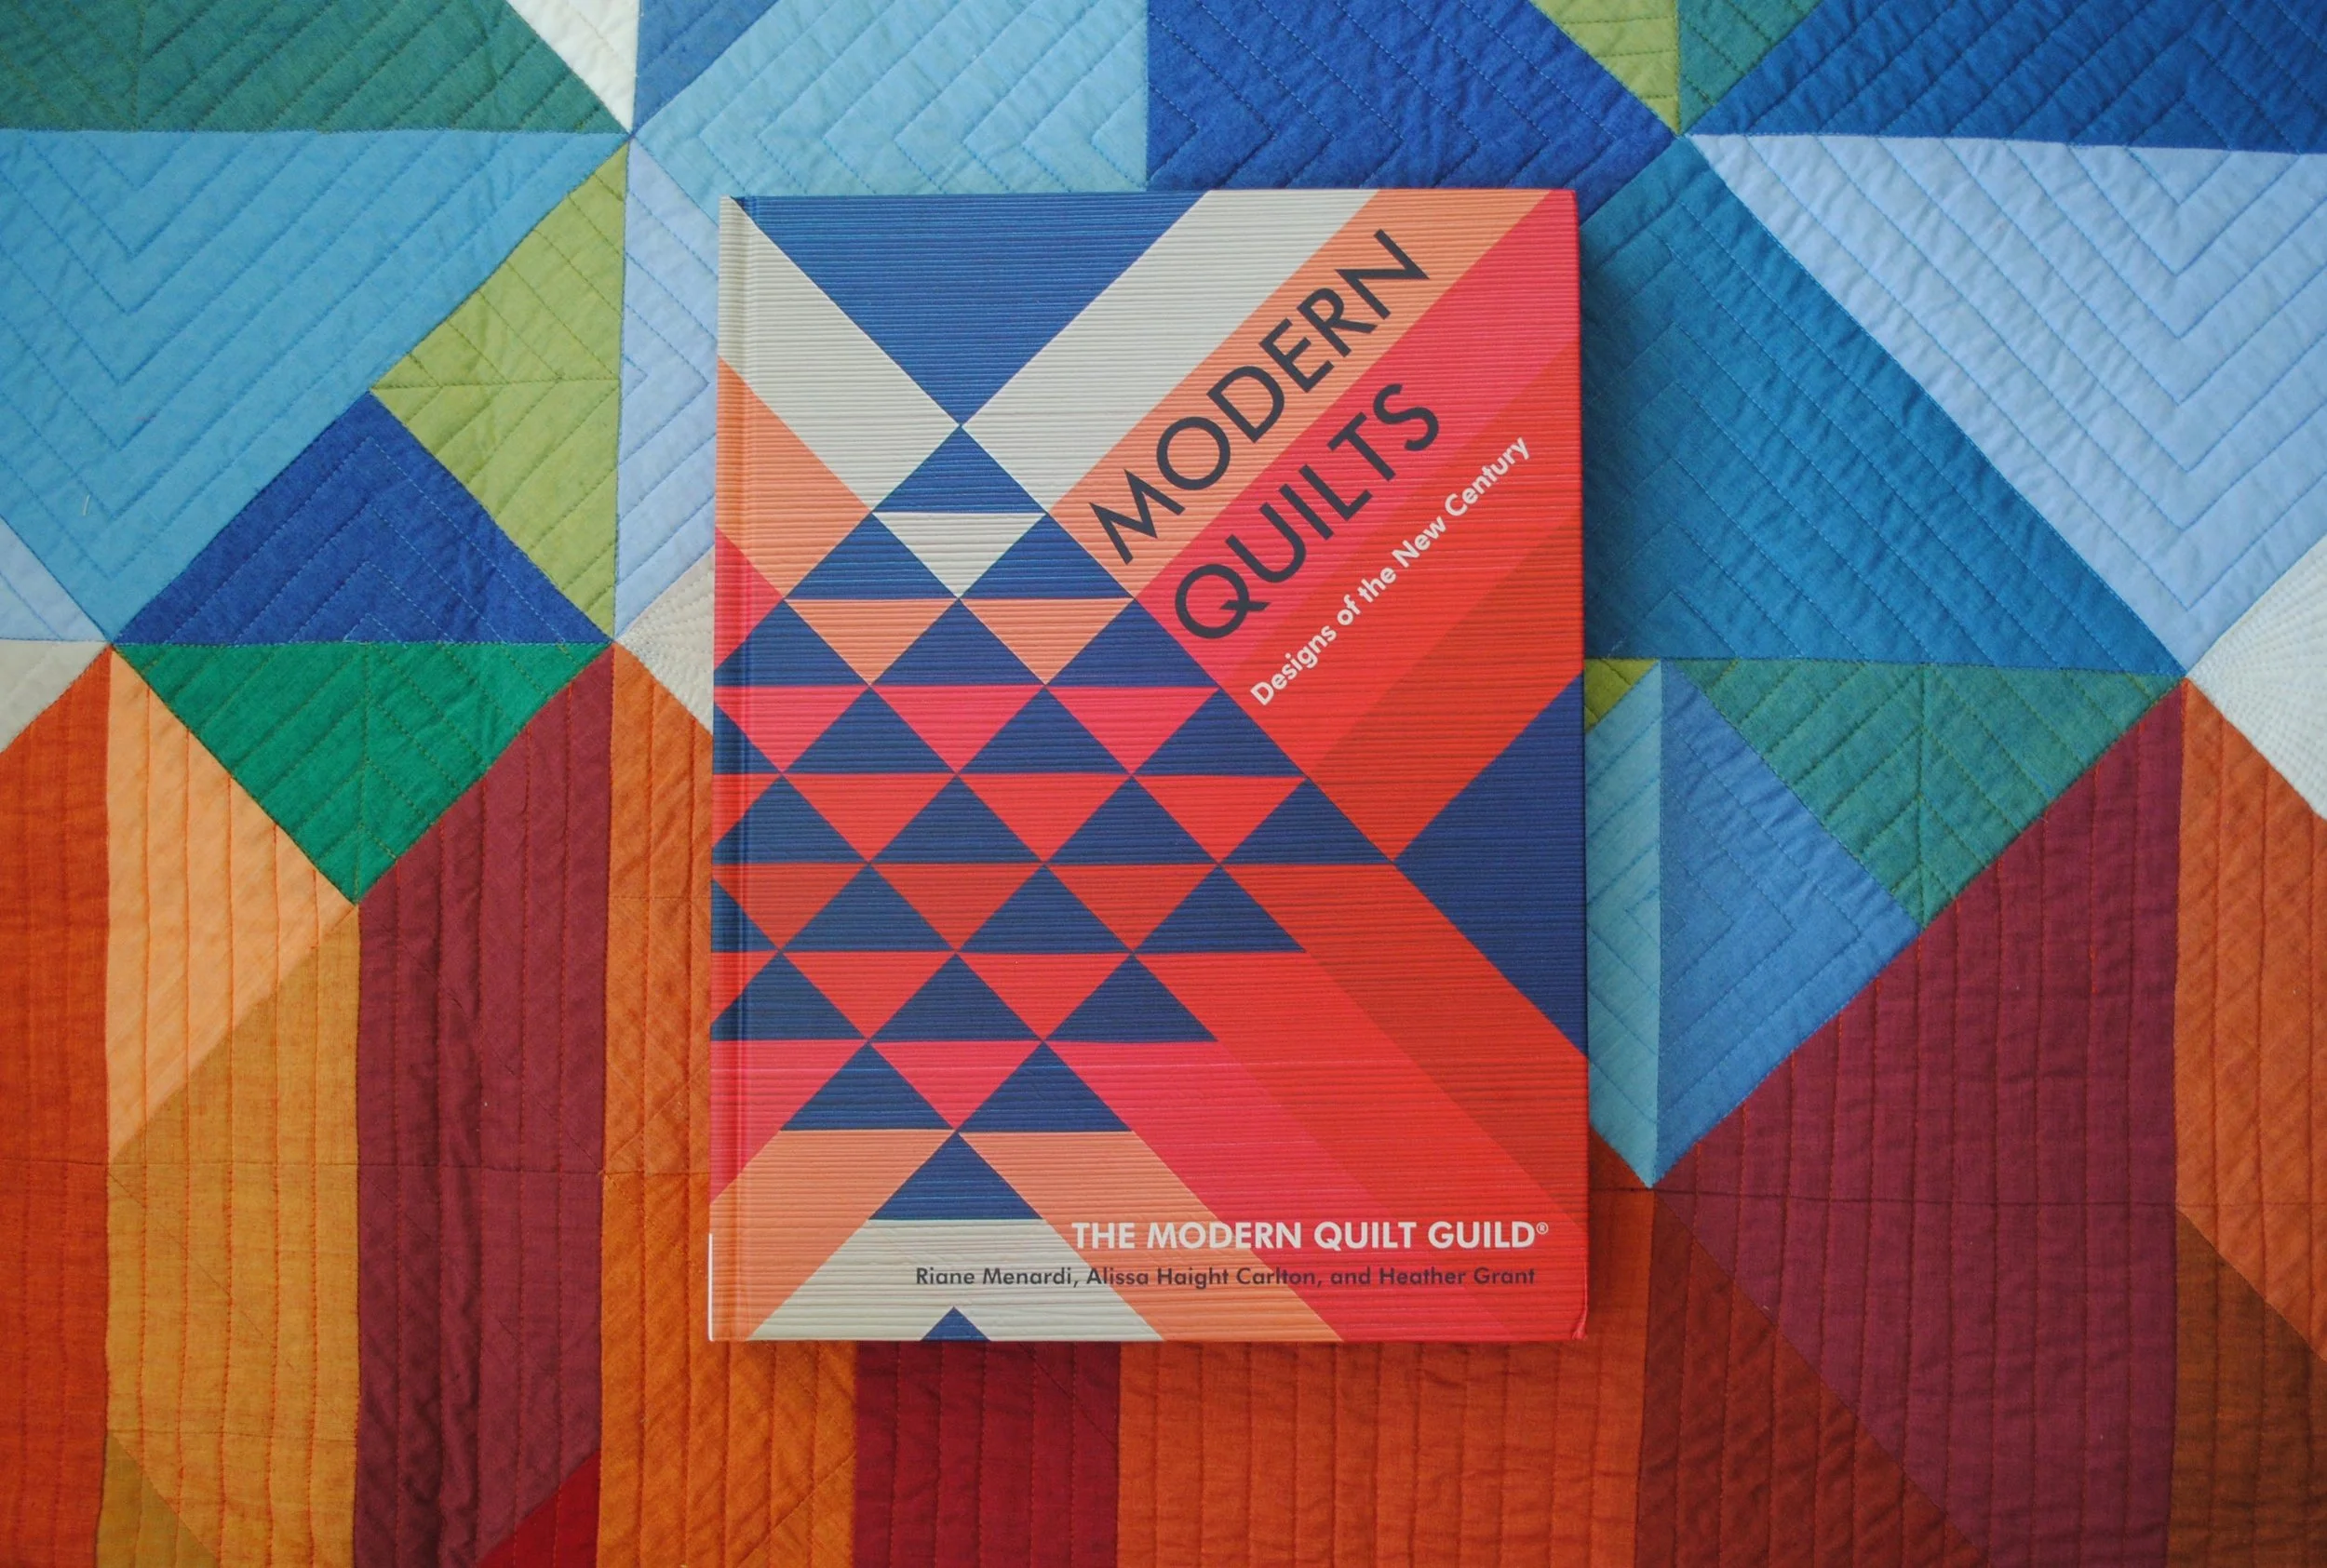
I am honored to have two quilts in the book Modern Quilts: Designs of the New Century. Riane Menardi, Alissa Haight Carlton and Heather Grant did a great job pulling together all the 200+ Quilts for the book. It’s a great visual representation of modern quilts and the Modern Quilt Guild.

mq book cover full.jpg

For my stop on the blog tour, I thought I would explain a bit about what the Modern Quilt Guild has meant to me in my quilting journey.

I have been quilting for 21 years – I made my first quilt when I was 13! I continued to make quilts off and on throughout high school and college. In my mid-20’s my friends started to have babies and I started making baby quilts. It was around this time that blogs were becoming more popular, and I had started seeing other quilters and the quilts they were making on the internet. I somehow learned about the modern quilt movement and discovered there was a guild right in my city.

In the fall of 2011 I joined the Kansas City Modern Quilt Guild. I tried to attend all the meetings I could, even though I didn’t know anyone (somewhat overwhelming for an introvert like me). I loved being surrounded by other people that also loved quilting. It was so inspiring to see the different quilts people made at Show & Tell and to hear from speakers that were doing new and unique things.

Over time, I started to become more involved in the guild, and even forced myself to share my own quilts in Show & Tell (even though it always makes my heart race)!

Being a part of the guild really pushed my quilting into a completely new place. I started making and designing more quilts and trying new things. I made quilts with solids only! I grew as a designer and as a quilter, and I know I would not have created all the things I’ve made the last 6 years had I not been a part of the Modern Quilt Guild. I learned so much from the members of my guild, and appreciate the ones that went out of their way to help me on my quilt endeavors.

If you are at all interested in quilts and modern quilts, I highly recommend checking out your local MQG (if you are lucky enough to have one close by). I recently moved to Colorado and joined the Boulder Modern Quilt Guild. It’s smaller than my previous guild, but all the women have been so nice, and I know I will learn a lot! Moving to a new place, I am grateful to have a community to meet new people, and who also happen to share my love of quilting.

quilts in mq book.jpg

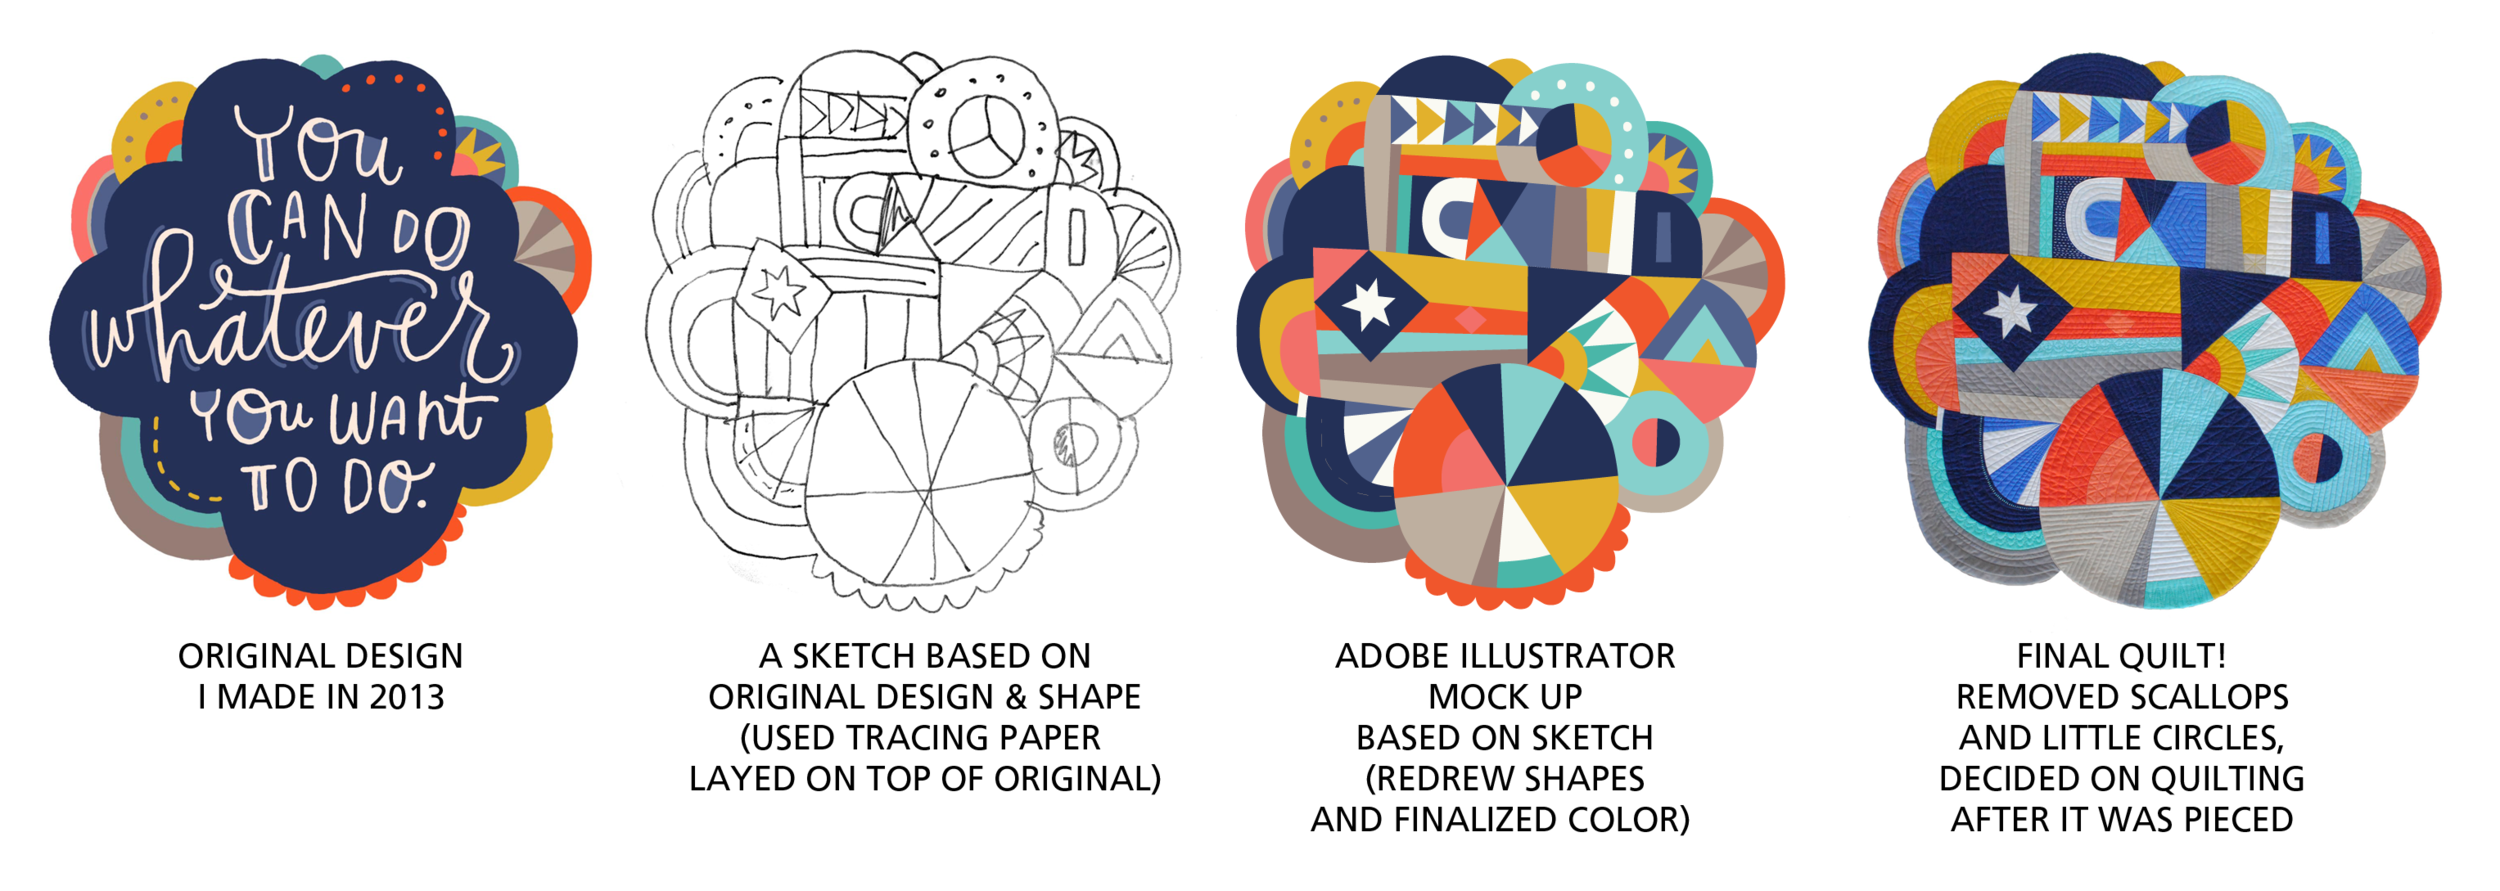
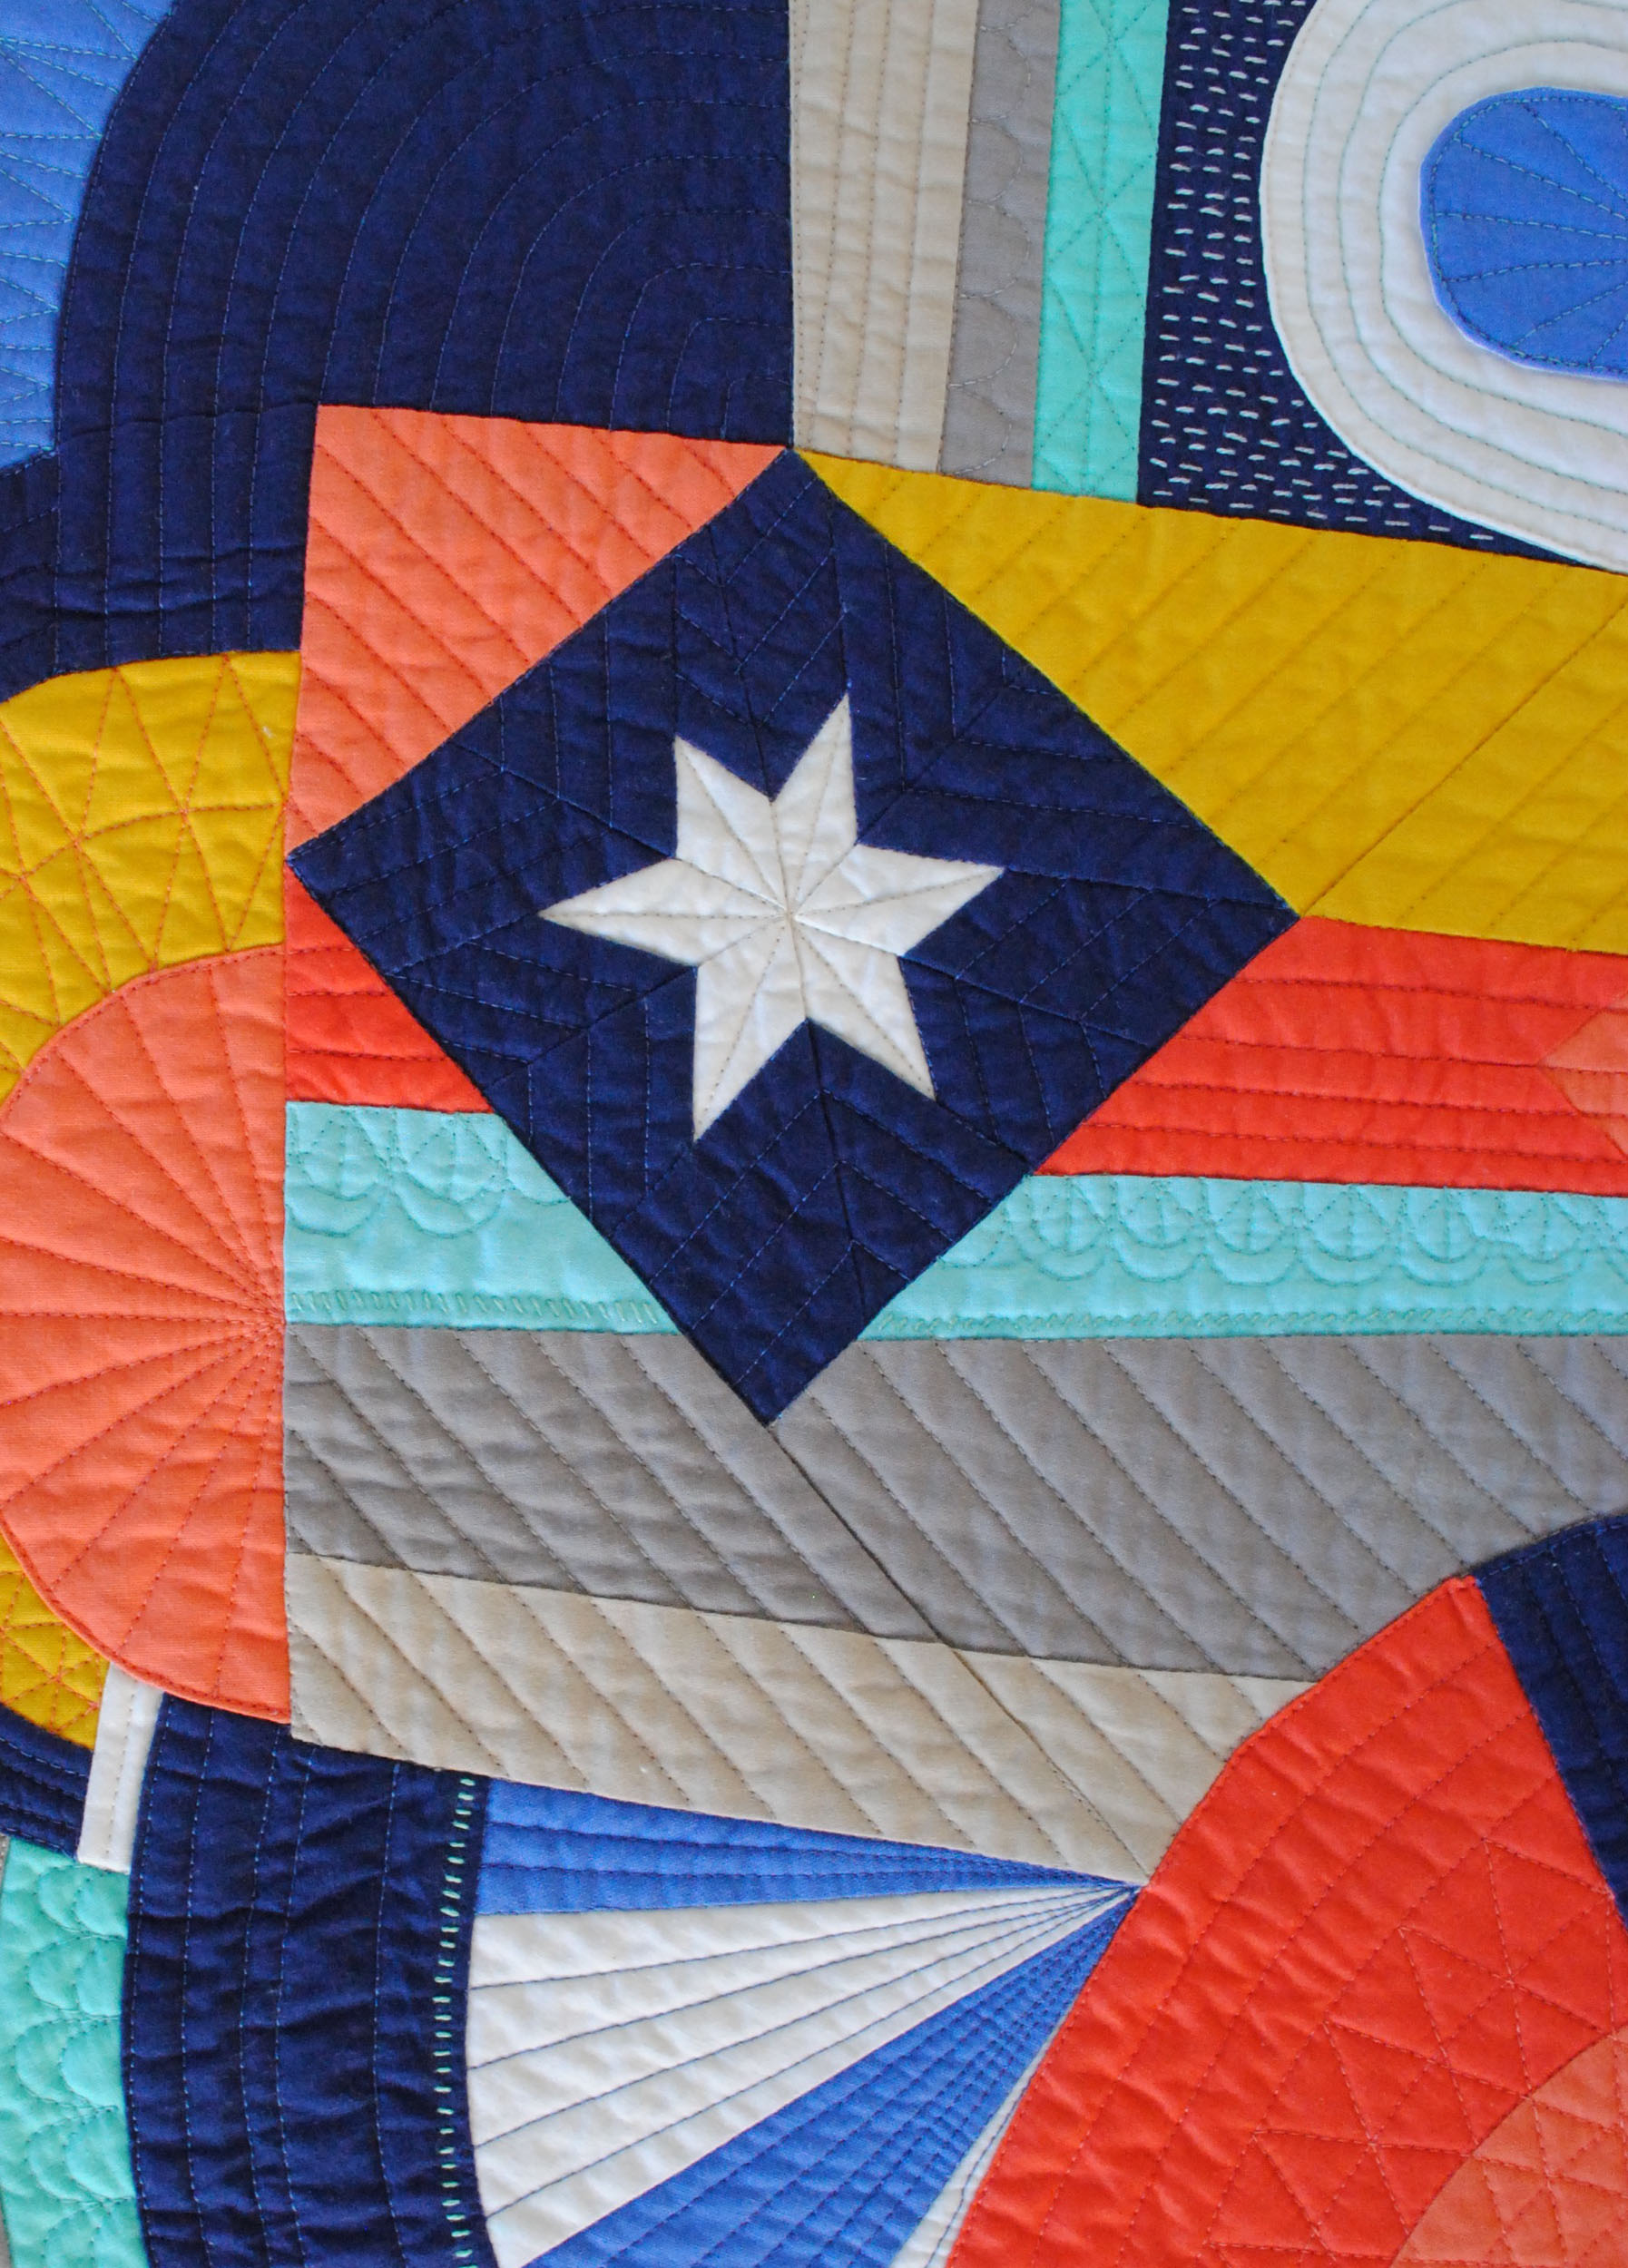
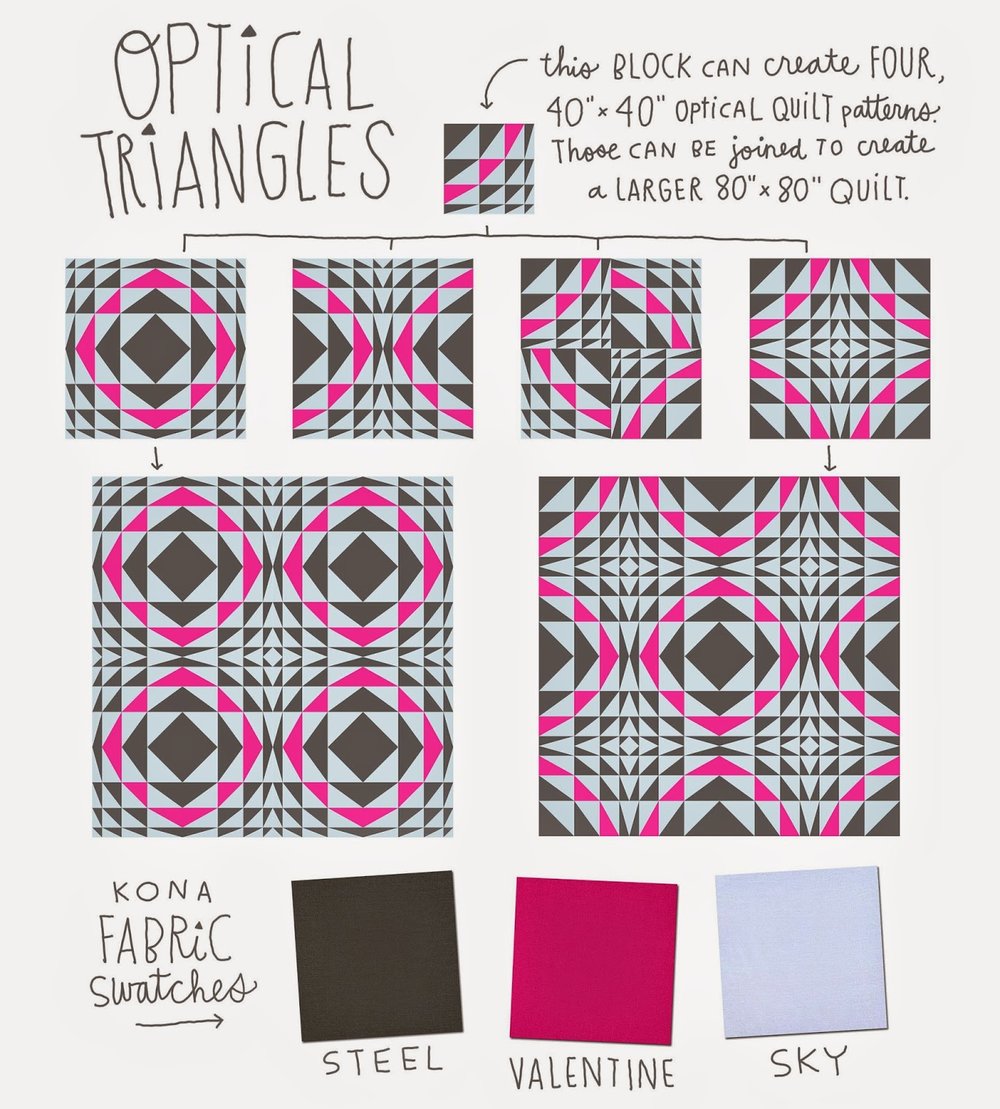
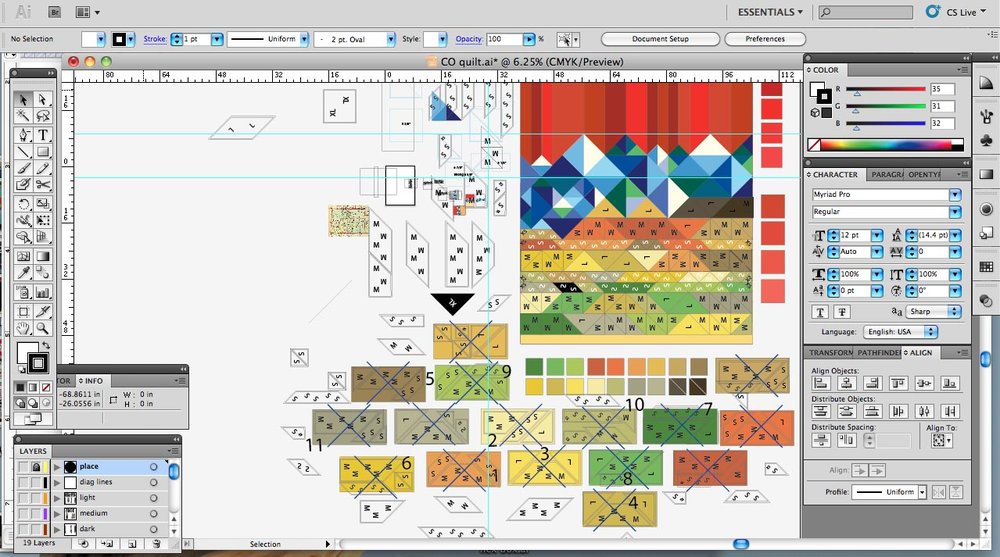
You can read my previous posts about my two quilts that are in the book Welcome to Colorful Colorado and Whatever to learn about how and why I made these quilts. If you are interested in making Welcome to Colorful Colorado, you can purchase the Colorado quilt pattern from my Etsy or Craftsy stores.

Check out other contributors on their blogs, below:

Amber Corcoran  Heidi Parkes  Melissa Cory  Penny Gold  Shruti Dandekar  Amy Friend  Paige Alexander  Angela Bowman  Lysa Flower  Sheri Cifaldi-Morrill  Jacquie Gering  Christa Watson  Heather Black  Kristin Shields  Krista Hennebury  Cinzia Allocca  Suzanne Paquette  Yvonne Fuchs  Ben Darby  Nicole Daksiewicz  Kristi Schroeder  Kathy York  Marla Varner  Brigette Heitland  Stacey Sharman  Stacey O'Malley  Kim Soper  Steph Skardal  Cheryl Brickey  Shea Henderson  Katie Pedersen

Whatever Quilt

I’ve wanted to do a blog post for a while that explained some of how I made Whatever Quilt. I began and completed this quilt in 2016. I entered it into QuiltCon 2017, where it won first place in the Small Quilts category in Savannah, Georgia. I love this quilt so much, and it feels really great when other people love and appreciate it too (not that I need the validation, but it does feel really good)! Please let me know if you have any other questions about this quilt, and I will try to answer them!

WHATEVER full quilt KL white.jpg

I got the idea of Whatever quilt from something I designed in 2014. It was a lettered quote that I made to remind myself “you can do whatever you want”. It’s easy to get caught up in self-doubt and that makes it hard to make decisions. Knowing you are in control and are capable can help push through some of those negative thought patterns.

whatever quilt + sketch.png

You can see from this series of images how the design changed, and didn’t change, through the process. I made a lot of the final decisions after I brought the sketch into Adobe Illustrator. Some decisions were based on overall design composition, and others were based on what I thought I could piece and construct well. For example, I had a hard time deciding on how to create the scallops on the bottom – how to sew them and make them look good, and how to attach them to the quilt. It was becoming too complicated for me, and I decided the overall design didn’t need them.

Using Illustrator was a great tool for me (I’m not sure I could have made Whatever without it). It let me easily play with the overall size and colors of each piece; and when it came time to actually make the quilt, made it easy to create templates with accurate seam allowances.

Whatever quilt was made with a variety of different techniques – nothing was off limits! There is a combination of piecing (with templates), paper piecing and applique. I didn’t really consider how it was all going to get sewn together until after the design was done. I didn’t want to limit myself, and I knew that I had enough experience to be able to eventually figure out how it could all go together.

whatever templates illustrator copy 2.png

I started by grouping things together into “blocks” and then figuring out where I needed seams and how each piece would actually join together. Then I created the templates and added the proper seam allowance and printed each piece to scale. None of this was improvised – everything was planned out very thoroughly before I began sewing (my brain just works better this way, and involves less stress for me in the end).

whatever fabric.jpg

I usually try to stick to one brand of fabric when working with solids, but the most important part is finding the right color. So, for this quilt I used a combination of Robert Kaufman - Kona, Michael Miller – Cotton Couture and Paintbrush Studio solids.

whatever close up 2.jpg

I knew while I was designing Whatever that I wanted a combination of machine quilting and hand quilting to add more dimension and texture. I didn’t decide on the final quilting designs until after it was all pieced together. I sometimes sketched ideas on paper, or used tracing paper on top of the quilt to play with different options.

WHATEVER detail KL.jpg

If you haven’t been able to see Whatever quilt in person, I hope these up-close photos will help show some of the detail of the piecing and quilting!

Optical Illusions Blog Tour & Book Giveaway

Hello! It’s my day on the Optical Illusions Blog Tour! I’ve never participated in a blog tour before, so hopefully this goes well:)

It took a bit of time for me to come up with a design for this book. I happened to find some good research/inspiration from a project I had done in design school (I’ve kept almost all of my college work because it was so time consuming I can’t part with it, and I’m a hoarder). I found lots of patterns and studies on color and form that provided much needed inspiration (I found good research on Google too). 


A lot of optical illusions work because of high contrasts in color, but I knew I wanted to include an accent of color as well, and that helped guide the design a bit. I also like the play with foreground and background, and how fluctuations in shape can create new forms or illusions. One of my favorite parts is how the quilt creates curved lines, even though all the forms are made of angles. 

I kept it really simple and only did stitch-in-the-ditch quilting on this. I was totally stumped on what quilting to do, because I didn't want anything that would detract from the overall design and pattern. Luckily, this book also comes with quilting ideas for optical illusions, so I may go back and add more quilting to it later! You can also read my other post about my quilt Curvilinear here.


As part of the blog tour, I am giving away a FREE Optical Illusions book! Just leave a comment below to enter the contest. A winner will be selected in one week, on Wednesday, November 19th. Also, check out the other blog tour participants and Optical Illusion designers below!

Congratulations to Lisa E. on winning the Optical Illusions book! Thanks to all those who visited the blog and left a comment. I loved hearing from all of you!

Nov. 3
My Stars – Kick Off www.mystarsblog.com (book)
Deb Rowden www.debrowden.blogspot.com (BB FQ bundle)

Nov. 4
Angela Walters www.quiltingismytherapy.com (Athena bundle)

Nov. 5
Penny Layman www.sewtakeahike.typepad.com (book)

Nov. 6
Melissa Corry www.happyquiltingmelissa.com (Oakshott FQ Bundle)
Lily’s Quilts www.lilysquilts.blogspot.com (3 - 5" Oakshott charm pack)
Fat Quarter Shop www.fatquartershop.blogspot.com (Naptime Bella FQ bundle)

Nov. 7
My Stars on behalf of Mary Kay Fosnacht/Karen Hansen www.mystarsblog.com (book AND Kona color card)

Nov. 10
My Stars www.mystarsblog.com (book)
Jamie David www.patchworkarchitect.blogspot.com (3 packs of charm squares from RK)

Nov. 11
Elizabeth Timmons www.andpins.wordpress.com (3 packs of skinny rolls from Robert Kaufman)
Tammie Schaffer www.craftytammie.com (book)

Nov. 12

Nov. 13
Jenifer Dick www.42quilts.com (book)
Trisch Price www.hadleystreetquilts.com (Kona color card)

Nov. 14
Jacquie Gering www.tallgrassprairiestudio.blogspot.com (Kona color card)
Shea Henderson www.emptybobbinsewing.com  (A large and small Kaleido-Ruler set by Marti Michell) 

Colorado Quilt Pattern & AQS Show!!

After almost a year, I have finally completed a pattern for Welcome to Colorful Colorado! There was a huge learning curve for me in making this pattern, and I made some mistakes along the way, but now it is complete!


I have chosen to start simple, and am selling this pattern on Craftsy. This is nice for a couple reasons; one, they are a great company that provides a great place to sell patterns; and two, they are based out of Denver, Colorado! It only seemed fitting that I would sell this pattern through a Colorado based company. I may also eventually sell it on Etsy, but I want to start small, and this seemed the best way to do it:) If you are interested in making Colorado quilt for yourself, check out the pattern here!


Welcome to Colorful Colorado was named Honorable Mention in the Modern Wall Quilt category at the Des Moines AQS quilt show at the beginning of October! This was my first time in a juried quilt show, so I was very excited that Colorado quilt was chosen to participate. It was also my first time visiting a large quilt show. I was able to go with my mom (who has been to MANY quilt shows before) and we had a lot of fun walking around the show, looking at quilts, and checking out vendor booths. I forgot to take photos at the show, but here's one of Colorado quilt and it's ribbon!

Optical Illusions Quilt Book!!


I am very excited to announced that I am published in a book! About a year ago I had the opportunity to submit a quilt design for an optical illusions book Kansas City Star Quilts was putting together (thanks Shea for letting me know about this project!). This was the first time I had created a quilt design for a specific project, and it was hard! It took me awhile to figure out what my design should be, but in the end, I am happy with the results. And KCSQ was so easy to work with, which was helpful for a newbie like me.

There are many other awesome quilts in this book too, some of which I'm hoping to get a chance to try out (I'll have to add it to my long list of quilt to-do projects). And, 7 of the 9 designers featured are also part of the Kansas City Modern Quilt Guild! I think that's pretty awesome, and it makes me very proud to be a member of our guild:)


Above is the design as I submitted it. You can see that the block is very versatile, so you can play around with the direction of your blocks, and you'll get different effects. It works great in different sizes too. The 80" x 80" (16 blocks) is a great large lap quilt, and the 40" x 40" (4 blocks) works great as a baby or wall quilt. You can see the smaller quilt in the photo below.


If you make this quilt, I would love to see it! When I showed my mom the design, she was not excited about all the pieces, but I hope you aren't dissuaded by that! If you like triangles and matching points like I do, than you will love this quilt. It has a lot of impact when it's all sewn together, so it will be worth it! You can get your copy of the book here.

Octagon Baby Quilt


My friend just had her second child, a boy! Designing quilts for a second baby is kind of difficult. Do you do something different, but what if one looks or seems more superior? I was a second child (ended up being a middle child) so I have very strong feelings about further children not getting screwed (my sister always seemed to get the better versions of everything).


So I decided the best thing was to do something similar, but different (you can see her daughter’s quilt here). I got the color palette from my friend and decided on an octagon for the shape. I used the same quilting as before, and used flannel on the back. I can’t wait to see her baby boy on his new quilt!

Large Fractal Radiance Quilt


I finished this quilt top back in September to test the large Fractal Radiance pattern. I would say the most time consuming part was choosing the fabrics. This was a last minute test, so I didn’t have time to purchase fabric and I didn’t really want to spend money on new fabric. It forced me to use what I had in my stash (a lot of green and yellow solids), which also led to a more unexpected color combination – at least for me. I had to piece a few of the triangles (you’ll notice it in the upper right red triangle) due to fabric that wasn’t quite big enough, but I think it actually worked for this particular quilt pattern. I also incorporated some small prints that almost read as solids – and I think it worked well!


Four months later I finally got around to quilting and finishing the quilt. I have been doing so much geometric/straight quilting, I really wanted to get away from that, so I just did an overall scallop pattern inspired by an old quilt passed down in Jesse’s family. Since the colors are more playful, I think having the contrast between the piecing and quilting works. I also added a normal binding, instead of the facing finish I used on the small fractal. I’m not quite sure where this quilt will end up, but I’m also not ready to give it away either. If anything, it should be a decent size for a lap quilt. Want to make one of your own? Purchase the pattern here!

A Jean Quilt


This quilt was made for Jesse’s brother for Christmas. All the materials (except the thread) were “recycled” which really fits his lifestyle of living simply. It’s also extremely thick and heavy, which should be durable and hopefully keep him warm. He lives in Canada, and enjoys camping in the winter, so I hope it will get lots of use! The quilt top is made out of 7 pairs of jeans – all but one were Jesse’s. The middle layer was a fleece blanket we were about to donate to Goodwill. Backing was fabric their grandma had and passed down to me. The binding is a canvas type material purchased from Fabric Recycles (a local store, it’s like a consignment fabric/craft shop).


It was fun to put the top together, but a bitch to quilt. It was so thick and heavy, and while my machine held up to the task, it definitely was a struggle. I have to say, I did not have fun quilting this, and wonder if using a long arm machine would have made the process more enjoyable.


This is the first jean quilt I made, here are some things I learned along the way: 
*I cut out each leg, cutting around the seams/pockets/zipper/knee holes as I went along. If you are doing an improv style quilt, you can wait to cut down the pieces as you go along. You’ll have to adjust width and length as you sew pieces together anyway. 
*Use a jean needle. I should have changed the needle at least once. It got dull, especially when quilting through all those layers. 
*Due to the large weave and thickness of jeans, I used a 3/8” seam allowance. I also tried to avoid cutting small pieces. I pressed the seams open after sewing two pieces together, but pressed to the side when joining strips (it gets bulky fast). 
*I cut 60 degree angles for the strips. I like the way it looks, but it did create extra material waste.


I used one of the pockets as the label, and left it open at the top. I used a fabric marker to letter the label. I have a hard time naming quilts, but we decided on Reclaimed Blues.

Christmas Tree Skirt

I got the Christmas tree skirt done three days before Christmas. The tree skirt was actually only in use for a few hours – the presents had to get packed up for the holidays right after this photo was taken. I don’t plan on making another tree skirt in my lifetime, so at least it will get a lot of use for all future Christmases. I also went ahead and made it double sided so if I ever want to change it up, I can just flip it over.


I got the idea from this tree skirt (this design is on a few other of their products as well). It’s essentially the same as the original – only I turned it into a pieced quilt, and have an open center and seam to allow it to fit around the water base for the tree. It’s from this great company, Ferm Living, based out of Denmark. If you’re in Europe, you probably have access to all their beautifully designed goods. In the US, especially in Kansas City, I’ve had a hard time finding their things.

This tree skirt has a diameter of about 47.25". The inner opening is about 14.75" - which is slightly larger than it probably could have been. I can't share the more intricate pattern, since I didn't design it, but thought I'd include the template for the basic pattern piece. Print out the three pages, and use the lines as guides to match up each page (the final pattern piece is close to 11"x17"). Quarter inch seam allowances are included. You will need to cut out 16 of these wedges total. The back of the tree skirt is made out of this simple pattern, using several different green fabrics.


The biggest mistake I made was using two different colors of “white”. I had enough fabric on hand to get half the pieces done, but had to order more. What I thought was Kona Snow, was actually Kona Bone. Oops. Fortunately, you really only see half the tree skirt when it’s under the tree, so I put the darker Bone color in the back. The brighter blue color is a Free Spirit Designer Solid, though I’m not sure which color – maybe Parrot Blue?


I also didn’t realize until after I printed out the templates, that it involved Y seams. I’ve never done Y seams before, and it required watching a few YouTube videos to figure out what I had done wrong the first time I tried sewing it together. In the end, the Y seams weren’t too painful to sew, and didn’t take too much more time – so I’m glad I just went ahead and tried it out.

Happy Holidays! See you in 2014!

Fractal Quilt Phone Wallpaper

In honor of the Fractal Radiance pattern coming out, I thought I’d provide a little freebie! Not only does fractal make a fun quilt pattern, but it works great as phone wallpaper too. The colors and pattern add just enough interest as a backdrop without being too distracting. And the little bit of texture from the quilting softens it up a bit.


I’ve provided two sizes, one for iPhone 5's, and the other for Android (I’m not sure if this works on all Android phones. The one shown is a Google Nexus). For iPhones, click and hold on the image, and select ‘Save Image’. Go to your settings, under ‘Wallpapers and Brightness’ and select ‘Choose Wallpaper’. The saved image should show up in your ‘Camera Roll’. For Android, click and hold on image, and choose ‘Set as Wallpaper’.


ABOVE: iPhone 5/5c/5s
BELOW: Android

Fractal Radiance Quilt & Pattern


I’m very excited to announce this next quilt, as it’s the first pattern I have ever written! It started with a pillow I made for my friend Lindsay (photo below) which I turned into a small quilt for myself (photo above). It gets so cold at work, and I need something to bundle up in! About the time I finished the quilt, the Kansas City Modern Quilt Guild I’m a part of announced they were hosting a pattern contest. Anyone in the guild could submit a quilt idea, and they chose mine! It was such a great learning experience, and I was just one of many, many people who helped get this quilt pattern out into the world. I’m so grateful for each person’s help, advice and feedback.


You can check out more information here, on the KCMQG site. The pattern includes instructions for a small and large lap quilt, and a small pillow. I hope people enjoy it, and I can’t wait to see what quilters create with this pattern!

A Scalene Right-Angled Triangle Quilt


Another baby quilt I made last year! You can make this one too. It's really easy and fast to cut out, and pretty easy to sew as long as you don't mind matching up a few points.

Below are a few test photos I took playing with different ways to lay out the triangles. Triangles are fun because they can create so many other shapes and designs just by the way you rearrange them. Since these are scalene (all unequal sides) triangles, it makes the quilt just slightly longer than wide.


The finished dimensions are about 36" x 45", but you could add more triangles to make it a bigger if needed. Cut a rectangle 10 1/8" x 12 5/8", and than cut the triangle in half diagonally. Repeat this step 16 times total, with half the triangles in navy (or another color) and the other half in brighter colors.

The Colorado Quilt

UPDATE: You can now purchase my Welcome to Colorful Colorado quilt pattern on Craftsy!


This quilt was Jesse’s 30th birthday present, and it was quite the process. Last year Jesse won a very large stack of Oakshott cotton at a Kansas City Modern Quilt Guild event that I brought him along to, and he very graciously gave it to me! I knew I had to make something for him with it, so the fabric was the first decision I made in making this quilt. I decided on Colorado for the theme, since he was born and raised there, and chose to use lots of graphic shapes for the pattern.

I started in June, giving me plenty of time to finish it. I didn’t want him to know that I was making it, so the only time I could work on it was when he wasn’t around. Fortunately, I found a few hours here and there each week. But, boy, that was stressful! I never want to have to quilt in secret again:)


The Oakshott fabric (oh my goodness, I love this fabric!) came in fat eighths, which definitely added complexity and time to the quilt. It all worked out in the end, but having fat quarters would have helped tremendously - not that I can complain, it was free after all. I drew everything in Illustrator, figured out the sizes, and also assigned every piece to a color since I was limited on fabric. My brain got a total workout on this one!


The quilt works both vertically and horizontally. Vertically, it’s like your standing in a field, looking at the sun setting behind the mountains. The large brown piece on the right represents the flat irons, which are located in the Boulder area where he grew up. If you hold it horizontally, it reflects the map of Colorado. Jesse actually taught me this, but Colorado is divided into thirds, with the mesas on the west (the reds) the mountains in the middle (blues are rock, white is snow, and green is the trees) and the plains (yellows, greens and browns) on the east.


I decided to name the quilt “Welcome to Colorful Colorado”. It only seemed fitting - a colorful quilt to represent the state’s motto. I used freezer paper and fabric paint to do the label on the back, and a facing finish binding to complete the quilt. 


I gave him his quilt last weekend, and he loved it! He’s so excited to have a quilt all his own.

Baby Quilt

This past year was full of several of my friends having babies. I guess I am at that age where people start to procreate – even though I still don’t feel old enough to take care of another human being!

The fun part of friends having babies (besides the cute babies) is getting to make quilts for them. Baby quilts are the perfect size to make. Anything bigger just seems unmanageable and way too time consuming.


One of my favorites I finished was for my good friend Jenn’s baby girl. Jenn and her husband have a very modern design aesthetic and picked lots of bright colors for the nursery, which made it even more fun to make! I used solids, and free-motion quilting that added a lot of texture. I used this fabric on the back, which helped inspire the quilt too. A lot of people thought it looked like the Trivial Pursuit game piece, or a game spinner – not intentional, but it would be really fun to do game inspired quilts in the future!


I was so excited to see her monthly photos taken on the quilt. Isn’t their baby girl adorable?! She’s even bigger now and almost 7 months old!

Peace Quilt

I made this quilt for my mother-in-law back in April. I actually made it in a record 3 days! Eek! It helped that it was a simple design, plus I was highly motivated and didn't leave the house for an entire weekend. Sometimes this is the only way things will get done. I took these photos before I added the binding, but these photos have the best lighting.


I've been trying out piecing letters, and love the way you can incorporate words and phrases into a quilt. I think I actually used paper piecing this time for the letters which worked out well, and was fast too!

For the past several years they have been staying on a beach near Santa Barbara for a couple of months out of the year, so I used that as the inspiration. I used some Oakshott fabric I won last year which is such wonderful fabric and so perfect for this quilt. The threads are dyed and then woven together. In several of the fabrics they combine two colors, which give it an iridescent feel - so pretty:)


I left in the background on these because I just learned the best way to photograph a quilt is by hanging it on the wall. Duh, saves you from risking falling off a chair, or dropping your camera - and the quilt won't look warped from the weird angle. These is the last quilt to get photographed like this - thank goodness!

International Quilt Study Center & Museum

Last month I went to the International Quilt Study Center & Museum in Lincoln, Nebraska to celebrate my mom's birthday. We had talked about going for some time now, and finally planned the trip! She brought along two of her good friends, and we turned it into a little weekend trip.


They had a display of miniature and toy sewing machines - I desperately want that blue one at the top!


The quilt below was made by a seamstress in Lincoln. She made it between 1909 and 1914, and is made of 10,222 pieces! And those pieces are tiny too! I can see why it took her 5 years to complete:)


A guy pieced and quilted this one above! He was an engineer, and used his math skills to perfect quilting.


They have a collection of over 4,000 quilts, but they only show a couple dozen at a time, and rotate the quilts in themed exhibits. I loved that it was just three curated little exhibits. Most museums have so much art to look at, it can be overwhelming, and I tend to get bored - but this had just the right amount. You could go once a year and see different quilts, and hear different stories every time.

One lesson I learned after visiting - label your quilts with your name and year! I have only done this once, but will try to be more diligent about it in the future. You can check out their website to see their current and future exhibits, and also see images of their quilt collection.

Quilted Pillows


Last winter I made several pillows for friends. Turns out quilting/sewing in small sizes is a lot more fun and a lot less time consuming! This was also my first time trying improvisational piecing - and I loved it! I can spend so much time planning a quilt out, and doubting my decisions, but with improv you just have to go with the flow. I also incorporated lettering into the quilting, because I love putting quotes on things. My favorite: "Just think lovely, wonderful thoughts" - thanks J.M. Barrie (Peter Pan).